
Getting started with Relyt One managed auth
A step-by-step guide to a multi-user Next.js app on Relyt One. Enable managed auth on a branch, sign users in, verify their JWTs with @relyt/auth, and let Postgres row-level security keep every user's rows apart.
On this page

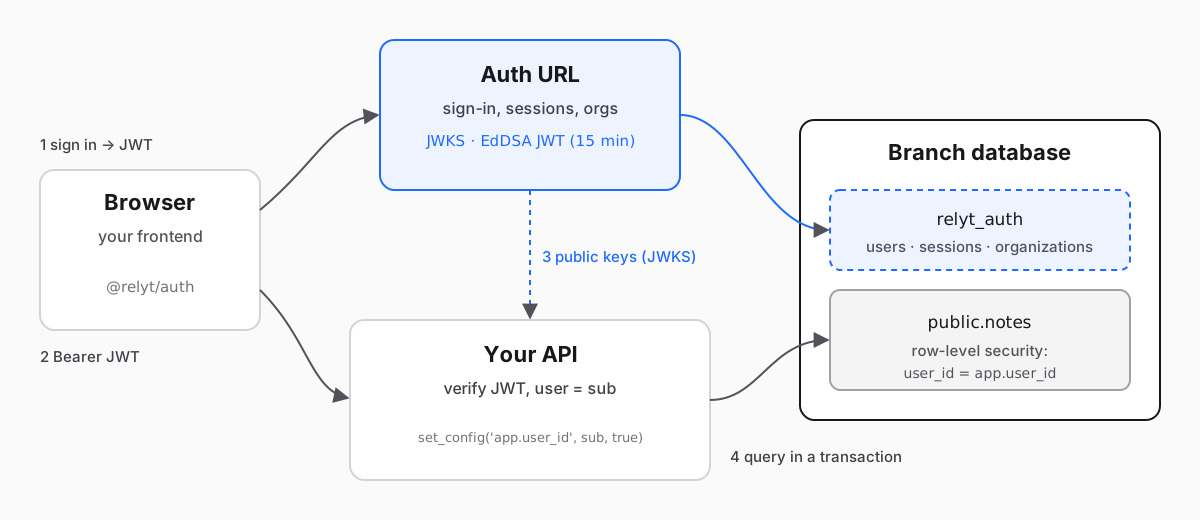
In this guide we build a small multi-user notes API on Relyt One. Users sign up and sign in on the branch's managed-auth URL, the app verifies their tokens with @relyt/auth, and Postgres row-level security makes sure each user only ever reads and writes their own notes. Along the way we cover the parts that usually go wrong: trusted origins, issuer mismatches, BYPASSRLS roles and pooled connections.
You need a Relyt One project, Node.js 20 or later, psql, and about thirty minutes. Everything here also works with the open-source TODO example, which is the same pattern with more features (social sign-in, teams and roles, and a test suite). If you want the background on why managed auth works this way, read Managed auth for Relyt One, now in preview first.
- A
notestable with one owner per row, protected by row-level security. - A Next.js route
/api/notesthat lists and creates the caller's notes. It only acceptsAuthorization: Bearer <jwt>. - A browser helper that signs a user in on the auth URL and calls the API with a fresh JWT.
Two rules hold the whole design together, and every step below follows from them:
- The user id comes only from a verified JWT. Never from a header, query string or request body.
- The database checks it too. The API filters by user, and RLS filters again, so a forgotten
WHEREcan't leak anyone else's rows.
In the console, open your project and pick the branch your app will use. While you are developing, a child branch of main is a good choice: its auth settings, sessions and signing keys are its own, so experiments never touch production sign-ins. (If you create the child after enabling auth on main, it starts with a copy of main's trusted origins and end users, so treat it as holding real user data.)
Go to the Auth tab and choose Enable auth. The first setup wakes up the branch's compute and creates the auth tables; it takes about a minute, so keep the page open. Only organization owners and admins can do this.
When the status turns Ready, the overview shows two URLs:
- Auth URL: where your users sign in, and the value your backend expects as the token issuer.
- JWKS URL: the public keys your backend uses to check token signatures.
Copy both. Users, sessions and organizations are now stored in the relyt_auth schema of this branch's database.
Under Sign-in methods, make sure Email + password is enabled (it is on by default) and save. That is all this guide needs.
GitHub and Google work the same way once you have an OAuth app: copy the callback URL the console shows (it points at the auth URL, for example <auth URL>/api/auth/callback/github) into the provider's settings, then paste the client ID and secret into the console and choose Save & enable. The secret is write-only. A GitHub OAuth app can register only one callback URL, so use one OAuth app per branch.
The auth URL is a different origin from your app, so the browser sends a CORS request every time your app signs someone in. The auth service only answers origins you list.
Under Redirects & origins, add your app's exact origin to Trusted origins:
http://localhost:3000while developing;https://app.example.com(or wherever you deploy) later.
No paths, no trailing slash, no wildcards. If you add social sign-in later, also register the page that finishes the sign-in, such as http://localhost:3000/auth/callback, under Callback URLs. Callback URLs are matched exactly, and each one's origin must also be a trusted origin.
Connect to the branch as the database owner (relytdb_owner on the relytdb database, with the password you set when you created the project) and create the table:
CREATE TABLE notes (
  id         uuid PRIMARY KEY DEFAULT gen_random_uuid(),
  user_id    text NOT NULL,
  body       text NOT NULL CHECK (length(body) BETWEEN 1 AND 2000),
  created_at timestamptz NOT NULL DEFAULT now()
);
CREATE INDEX notes_user_id_idx ON notes (user_id, created_at DESC);
user_id holds the sub claim from the user's JWT, which is a text id.
Now turn on row-level security and add a policy that compares each row's owner with a setting the app will set for every transaction:
ALTER TABLE notes ENABLE ROW LEVEL SECURITY;
ALTER TABLE notes FORCE ROW LEVEL SECURITY;

CREATE POLICY notes_owner ON notes FOR ALL
  USING (user_id = current_setting('app.user_id', true))
  WITH CHECK (user_id = current_setting('app.user_id', true));
What each part does:
ENABLEturns RLS on;FORCEmakes it apply to the table owner too, unless the owner hasBYPASSRLS. On Relyt One,relytdb_ownerdoes, so it still sees every row (the next point).USINGfilters which rows a query can see, update or delete.WITH CHECKrejects inserts and updates that would create a row owned by someone else.current_setting('app.user_id', true)returns the setting, or nothing if it was never set (thetruemeans "don't raise an error"). When it is missing, no row matches, so code that forgets to set it sees an empty table instead of everyone's notes.
This is the step people skip, and it silently turns off everything above.
Superusers and roles with BYPASSRLS ignore every policy. Database users created from the Relyt One console have BYPASSRLS, and so does relytdb_owner, the owner role every project starts with. Use the owner to create tables, never to serve requests. If your app connects as one of them, the policy never runs, and the only thing keeping users apart is your application code.
Create a dedicated role for the app with SQL instead:
CREATE ROLE notes_app LOGIN NOBYPASSRLS NOSUPERUSER NOCREATEROLE NOCREATEDB;
\password notes_app
GRANT USAGE ON SCHEMA public TO notes_app;
GRANT SELECT, INSERT, UPDATE, DELETE ON notes TO notes_app;
\password is a psql command that prompts for the password, so it never ends up in your shell history or the server logs. Check the result:
SELECT rolname, rolbypassrls, rolsuper FROM pg_roles WHERE rolname = 'notes_app';
--  rolname   | rolbypassrls | rolsuper
-- -----------+--------------+----------
--  notes_app | f            | f
Both columns must be f. A role created this way logs in through both the direct and the pooled connection strings; we checked the whole pattern in this step on a real branch, including that the policy holds behind the pooler.
Create a Next.js 15 app and install the SDK and the Postgres driver (@relyt/auth/next supports Next.js 14.2.35+ and 15.5.28+, not 16 yet, so pin the version):
npx create-next-app@15 notes --ts --app
cd notes
npm install @relyt/auth pg
npm install -D @types/pg
Add the settings to .env.local:
# The Auth URL from step 1: an origin only, no trailing slash, no path.
RELYT_AUTH_ISSUER=https://<your auth URL>
RELYT_AUTH_JWKS_URL=https://<your JWKS URL>

# The same auth URL, for the browser.
NEXT_PUBLIC_RELYT_AUTH_URL=https://<your auth URL>

# Connect as notes_app, the role from step 4, never as a console-created user.
DATABASE_URL=postgresql://notes_app:<password>@<host>/relytdb?sslmode=require
The issuer must be exactly the auth URL's origin, because tokens carry that value in both iss and aud and the SDK compares it character by character. sslmode=require matters too: connections to Relyt One use TLS, and node-postgres doesn't turn it on unless you ask.
Put all database access behind a single function that opens a transaction, sets app.user_id from the verified user id, and only then runs your queries.
// lib/db.ts
import { Pool, type PoolClient } from "pg";

const pool = new Pool({ connectionString: process.env.DATABASE_URL, max: 10 });

export async function withUser<T>(userId: string, fn: (db: PoolClient) => Promise<T>): Promise<T> {
  if (!userId) throw new Error("withUser: empty user id");
  const client = await pool.connect();
  try {
    await client.query("BEGIN");
    // `true` = local to this transaction: a pooled connection never carries it to the next request.
    await client.query("SELECT set_config('app.user_id', $1, true)", [userId]);
    const result = await fn(client);
    await client.query("COMMIT");
    client.release();
    return result;
  } catch (e) {
    await client.query("ROLLBACK").catch(() => undefined);
    client.release(true); // drop a connection that may be broken instead of returning it to the pool
    throw e;
  }
}
The third argument to set_config matters more than it looks. Without it the setting lasts for the whole session, and with a connection pool the next request that borrows this connection would run as the previous user. With true it disappears at COMMIT or ROLLBACK.
The same holds behind PgBouncer's transaction pooling, because the setting never outlives the transaction.
getClaims from @relyt/auth/next reads the bearer token, checks its EdDSA signature against the JWKS, checks the issuer, audience and expiry, and returns the claims, or null if the token is missing or invalid.
// lib/auth.ts
import { getClaims, RelytAuthUnavailableError } from "@relyt/auth/next";

export type Caller = { ok: true; userId: string } | { ok: false; response: Response };

export async function requireUser(req: Request): Promise<Caller> {
  try {
    const claims = await getClaims(
      req,
      { issuer: process.env.RELYT_AUTH_ISSUER!, jwksUrl: process.env.RELYT_AUTH_JWKS_URL },
      { cookie: false }, // API routes accept bearer tokens only
    );
    if (!claims?.sub) {
      return { ok: false, response: Response.json({ error: "unauthorized" }, { status: 401, headers: { "www-authenticate": "Bearer" } }) };
    }
    return { ok: true, userId: claims.sub };
  } catch (e) {
    if (e instanceof RelytAuthUnavailableError) {
      // The keys could not be fetched. Don't answer 401: that would sign everyone out during a network blip.
      return { ok: false, response: Response.json({ error: "auth_unavailable" }, { status: 503, headers: { "retry-after": "2" } }) };
    }
    throw e;
  }
}
Accepting bearer tokens only (cookie: false) keeps the API free of CSRF: a browser never attaches an Authorization header to a cross-site request on its own.
// app/api/notes/route.ts
import { requireUser } from "@/lib/auth";
import { withUser } from "@/lib/db";

export async function GET(req: Request) {
  const caller = await requireUser(req);
  if (!caller.ok) return caller.response;

  const notes = await withUser(caller.userId, async (db) => {
    const { rows } = await db.query(
      "SELECT id, body, created_at FROM notes WHERE user_id = $1 ORDER BY created_at DESC LIMIT 100",
      [caller.userId],
    );
    return rows;
  });
  return Response.json(notes);
}

export async function POST(req: Request) {
  const caller = await requireUser(req);
  if (!caller.ok) return caller.response;

  const input = await req.json().catch(() => null);
  const body = typeof input?.body === "string" ? input.body.trim() : "";
  if (body.length < 1 || body.length > 2000) return Response.json({ error: "invalid_body" }, { status: 400 });

  const note = await withUser(caller.userId, async (db) => {
    const { rows } = await db.query(
      "INSERT INTO notes (user_id, body) VALUES ($1, $2) RETURNING id, body, created_at",
      [caller.userId, body],
    );
    return rows[0];
  });
  return Response.json(note, { status: 201 });
}
Notice that the query still says WHERE user_id = $1 even though RLS would filter anyway. Keeping both is deliberate: the query is fast and explicit, and the policy is the safety net for the day someone writes one that isn't.
Also notice what the handler doesn't do: it never reads a user id from the body or the query string. The user_id it writes is the one from the token.
The browser talks to two places: the auth URL, to sign in, and your API, with a JWT.
// lib/auth-client.ts
"use client";
import { createAuthClient } from "@relyt/auth";

const authUrl = process.env.NEXT_PUBLIC_RELYT_AUTH_URL!;
const KEY = "notes.session-token";

export const authClient = createAuthClient({
  authUrl,
  sessionToken: () => localStorage.getItem(KEY),
  onSessionToken: (t) => localStorage.setItem(KEY, t),
});

export async function emailAuth(mode: "sign-in" | "sign-up", email: string, password: string) {
  const body = mode === "sign-up" ? { email, password, name: email.split("@")[0] } : { email, password };
  const res = await fetch(`${authUrl}/api/auth/${mode}/email`, {
    method: "POST",
    headers: { "content-type": "application/json" },
    body: JSON.stringify(body),
    credentials: "omit",
  });
  if (!res.ok) throw new Error(`${mode} failed (HTTP ${res.status})`);
  const token = res.headers.get("set-auth-token");
  if (!token) throw new Error("No session token returned. Is this origin a trusted origin?");
  localStorage.setItem(KEY, token);
}

export async function api(path: string, init: RequestInit = {}) {
  const jwt = await authClient.getToken(); // cached; refreshed before it expires
  const headers = new Headers(init.headers);
  headers.set("authorization", `Bearer ${jwt}`);
  return fetch(path, { ...init, headers });
}

export async function signOut() {
  const token = localStorage.getItem(KEY);
  if (token) {
    // End the session on the auth URL, not just in this tab
    await fetch(`${authUrl}/api/auth/sign-out`, { method: "POST", headers: { authorization: `Bearer ${token}` }, credentials: "omit" }).catch(() => undefined);
  }
  localStorage.removeItem(KEY);
  authClient.clear();
}
How the pieces fit:
emailAuthposts to the auth URL. The response carries a session token in theset-auth-tokenheader. That token is the user's session: whoever holds it can get JWTs and call the auth URL's endpoints as that user until the session ends, so treat it like a password.authClient.getToken()exchanges the session token for a JWT (15 minutes, EdDSA) and caches it, refreshing it about two minutes before it expires.api()sends the JWT to your API. The browser never verifies tokens; that is the server's job.
Keeping the session token in localStorage keeps this guide short, but anything stored there can be read by any script running on your page, so a cross-site scripting bug would expose it. Keep third-party scripts off the pages that handle sign-in and use a strict Content Security Policy. The TODO example shows a sturdier setup that also puts the JWT in an HttpOnly cookie for page navigation.
A minimal page to try it:
// app/page.tsx
"use client";
import { useState } from "react";
import { api, emailAuth } from "@/lib/auth-client";

export default function Home() {
  const [notes, setNotes] = useState<{ id: string; body: string }[]>([]);
  const load = async () => setNotes(await (await api("/api/notes")).json());

  return (
    <main>
      <form
        onSubmit={async (e) => {
          e.preventDefault();
          const f = new FormData(e.currentTarget);
          await emailAuth("sign-up", String(f.get("email")), String(f.get("password")));
          await load();
        }}
      >
        <input name="email" type="email" required />
        <input name="password" type="password" required />
        <button>Sign up</button>
      </form>
      <button onClick={async () => { await api("/api/notes", { method: "POST", body: JSON.stringify({ body: "hello" }) }); await load(); }}>
        Add note
      </button>
      <ul>{notes.map((n) => <li key={n.id}>{n.body}</li>)}</ul>
    </main>
  );
}
Run npm run dev, sign up two users in two browser profiles, and add a note as each. Each user only sees their own.
Seeing it in a browser is nice. Seeing it refuse access when something is missing is better. Get a JWT for a user with curl:
AUTH=https://<your auth URL>
ORIGIN=http://localhost:3000

SESSION=$(curl -s -D - -o /dev/null "$AUTH/api/auth/sign-in/email" \
  -H "origin: $ORIGIN" -H "content-type: application/json" \
  -d '{"email":"alice@example.com","password":"<password>"}' \
  | awk 'tolower($1)=="set-auth-token:" {print $2}' | tr -d '\r')

JWT=$(curl -s "$AUTH/api/auth/token" -H "authorization: Bearer $SESSION" | sed 's/.*"token":"\([^"]*\)".*/\1/')

curl -s http://localhost:3000/api/notes -H "authorization: Bearer $JWT"
Then try the things that should fail:
# No token: 401
curl -s -o /dev/null -w "%{http_code}\n" http://localhost:3000/api/notes

# A tampered token: 401
curl -s -o /dev/null -w "%{http_code}\n" http://localhost:3000/api/notes -H "authorization: Bearer ${JWT}x"
And check the database's half of the bargain directly. Connected as notes_app, without setting app.user_id, the table is empty no matter how many notes exist:
SELECT count(*) FROM notes;            -- 0
BEGIN;
SELECT set_config('app.user_id', '<alice sub>', true);
SELECT count(*) FROM notes;            -- only Alice's notes
COMMIT;
If the first query returns every note, your app is connected as a role that bypasses RLS. Go back to step 4.
startSocialSignIn sends the user to GitHub or Google through the auth URL, and completeSocialSignIn finishes on your callback page using a one-time hand-off code and PKCE, so it works without third-party cookies. The console's Integration code panel has both snippets, filled in with your branch's URLs. The TODO example's README lists the rules for the callback page (it must run completeSocialSignIn before anything else, and sign-in must start and finish on the same origin).
When a user has an active organization, their JWT carries an o claim:
"o": { "id": "…", "slug": "acme", "role": "member", "perms": ["todo:create", "todo:read"] }Define resources and actions under Roles & permissions in the console, check o.perms in your API before each operation, and add a second RLS policy keyed on an org_id column (set it with another set_config in withUser) for shared rows. The TODO example implements exactly this, with all permission decisions in one module.
| Symptom | Likely cause |
|---|---|
| Sign-in in the browser fails with a network error | The app's origin is not in Trusted origins, or it has a path or trailing slash |
Every API call returns 500, and the server log shows a config error from @relyt/auth | RELYT_AUTH_ISSUER isn't a bare origin: it has a trailing slash or a path, or uses http for a host other than localhost |
| Every API call returns 401 with a valid-looking token | RELYT_AUTH_ISSUER is a different origin from the one that issued the token, for example another branch's auth URL |
| API returns 503 | The JWKS couldn't be fetched from the server. Check the server's outbound network access to the JWKS URL |
| The database connection fails or hangs | The connection string is missing ?sslmode=require |
| Users can see each other's rows when a query forgets its filter | The app connects as a role with BYPASSRLS (console-created users and relytdb_owner have it). Use the role from step 4 |
| Queries return no rows at all | app.user_id wasn't set in the same transaction as the query, or the query ran outside withUser |
| One request sees another user's rows, intermittently | set_config was called with false (session-wide) on a pooled connection. Use true |
- The app connects as a dedicated
NOBYPASSRLSrole (notrelytdb_owner), androlbypassrlsisf. - Every table with user data has RLS enabled and forced, with
USINGandWITH CHECK. - Every route handler calls
requireUser, even behind a middleware. - User ids come only from
claims.sub. - Sign-out calls the auth URL's
/api/auth/sign-out, and no third-party scripts run on pages that hold the session token. - A JWKS outage answers 503, not 401.
- Production origins are in Trusted origins, and production callback URLs are registered exactly.
- If you cache the JWKS yourself, the cache lives under 960 seconds and you refetch it when a token carries an unknown key id, so key rotations work. (
@relyt/authalready does both.) - You know that revoking a user's sessions in the console leaves already-issued JWTs valid for up to 15 minutes, and your app handles the cases where that matters.
- Clone the TODO example for social sign-in, teams, roles and a test suite that checks all of the above.
- Read the
@relyt/authREADME for every option ofcreateAuthClient,getClaimsandcreateVerifier. - Read Managed auth for Relyt One, now in preview for the design and the security model.


